Convention hall lighting is engineered to illuminate every square foot of floor space uniformly — which means it illuminates every exhibitor’s booth equally, including all of your competitors. The overhead fluorescents or metal halide fixtures that light a standard convention hall create zero differentiation between a $60,000 custom exhibit and a $4,000 rental with a tablecloth. Every booth looks equally flat under show floor ambient light. The exhibitors who stand out in any hall are the ones who understand that their booth’s lighting is a separate system — one they control, one they spec in advance, and one they pay for through the GSC electrical order. Lighting does three things for a booth that ambient hall light cannot: it directs attention to specific objects, signals commercial seriousness to buyers scanning the aisle, and creates a visual environment that makes visitors feel comfortable staying in the space longer.
This guide covers the most effective trade show booth lighting ideas by fixture type and application, where to position lights for maximum impact, how to calculate what to order from the general services contractor, and the mistakes that cause well-intentioned lighting setups to underperform. For the full cost breakdown of exhibit components including lighting and electrical services, the trade show booth rental cost guide covers every line item by booth size.
Want Booth With Perfect Lighting?
Pure Exhibits Designs Las Vegas Trade Show Booths With Integrated Lighting Planned From the First Design Consultation.
Why Does Booth Lighting Matter More Than Most Exhibitors Realize?
Studies on retail and exhibition environments consistently show that visitors are drawn to brighter areas in a room with uneven illumination. On a show floor where every booth is competing for the same aisle traffic, a booth that is visually brighter than its neighbors draws the eye first — before a visitor has read a single word of messaging. Lighting is the first impression, not the brand story in the headline. A buyer walking an aisle at pace makes a split-second decision about which booths warrant a slower walk or a stop. That decision is dominated by visual contrast and brightness, not content.
Beyond traffic attraction, lighting affects how long visitors stay. A well-lit booth with deliberate warm accent lighting in the conversation zone feels more comfortable than a flat, harshly lit space. Visitor dwell time in the conversation zone directly correlates with the quality and depth of the interaction — and ultimately with lead quality. Lighting that makes the product look better, makes the graphic colors appear more saturated, and makes the conversation space feel inviting is not an aesthetic preference: it is a functional investment in the commercial outcome of the show.
The third commercial function of booth lighting is the quality signal it sends before a visitor walks in. A booth with professional track lighting, backlit graphics, and deliberate accent lights reads as a company that invests seriously in its market presence. A booth operating under hall ambient light with no supplemental lighting reads as a company that either could not afford lighting or did not think about it. In a market where buyers are making vendor assessments with limited information, first-impression signals carry significant weight.

What Types of Lighting Work Best at a Trade Show Booth?
There is no single lighting solution that works for every booth and every product category. The right lighting mix depends on what you are displaying, the visual tone your brand requires, and the size of the booth space. The table below maps the primary lighting types used in professional exhibit programs against their best applications and key specifications.
| Fixture Type | Best Application | Color Temp Range | Energy Draw | Key Advantage |
|---|---|---|---|---|
| LED track spotlights | Back wall graphic illumination; product spot lighting; directional accent | 2700K–5000K (adjustable on quality units) | 15–25W per head | Most versatile booth light; adjustable aim and beam angle; available in rental programs |
| SEG lightbox / backlit display | Full back wall or panel illumination from inside the frame | Typically 4000–5000K (cool white for graphic clarity) | 50–150W per panel depending on size | Most visually impactful single upgrade; graphic colors appear vivid even from aisle distance |
| LED strip / tape lighting | Counter edge lighting; shelf underlighting; structural accent; halo effects | 2700K–4000K | 5–10W per linear foot | Creates depth, edge definition, and architectural character in the booth structure |
| Adjustable canister / can lights | Back wall wash lighting; general product area fill light | 3000K–4000K | 20–50W per fixture (LED version) | Familiar rental staple; cost-effective for general wash coverage |
| Gobo / pattern projector | Branded logo or pattern projected onto floor, back wall, or ceiling (where permitted) | Warm to cool depending on gel | 50–150W | Memorable visual element; floor projections define booth boundary for aisle visitors |
| LED neon / neon flex | Brand name or tagline as an illuminated element; social-media-ready visual focal point | Varies by color | 10–30W per linear foot | Highly Instagrammable; creates a distinctive visual hook for brand-forward exhibits |
| Pendant / hanging lights | Conversation zone ambient fill; overhead island presence (larger booths) | 2700K–3500K | 10–40W per fixture | Defines conversation space; adds residential warmth to hospitality-style booth zones |
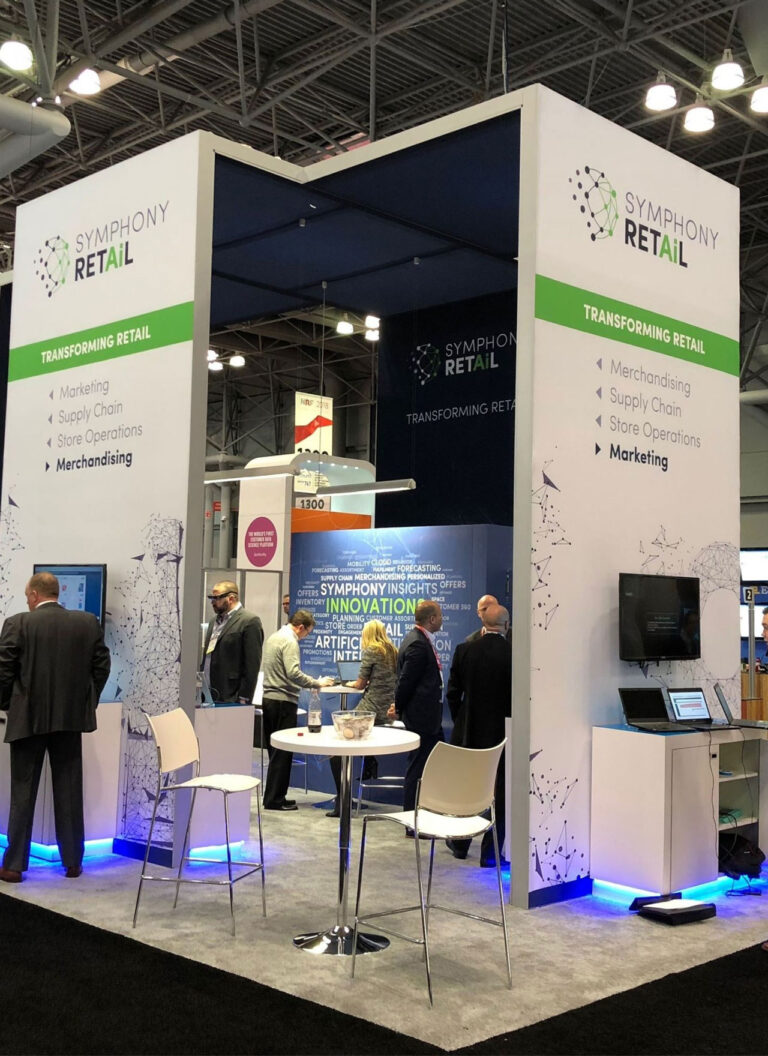
For most exhibitors building a professional booth program, the three-layer approach produces the best results: a primary back wall lighting layer (track spotlights or a backlit display), a secondary product and counter layer (focused spot or strip lighting), and an accent layer (LED strips or gobos) that creates visual depth without requiring significant amperage. The three layers work together to create a visually dynamic environment that reads as professional and intentional from aisle distance.
How Do You Use Backlit Graphics to Make a Booth Stand Out?
Backlit displays — specifically SEG (Silicone Edge Graphics) lightboxes — are the single highest-impact lighting upgrade available for any booth size, from a 10×10 trade show booth to a 30×30 island. Where a front-lit graphic relies on external spotlights to illuminate the print surface, a backlit display illuminates the graphic from behind using an internal LED panel, causing the graphic to glow from within. The result is significantly more vibrant color, greater apparent brightness than the surrounding hall, and a visual presence that reads from 20 to 30 feet of aisle distance rather than the 8 to 12 feet typical of a well-lit front-facing graphic.
How SEG Lightboxes Work
An SEG lightbox is an aluminum extrusion frame fitted with an internal LED light panel. The graphic — printed on stretch fabric with a silicone bead sewn around its perimeter — is inserted into the frame’s channel groove and pulled taut, creating a seamless, wrinkle-free surface. The LED panel behind the fabric illuminates evenly from edge to edge, eliminating the hot spots and dark corners that plague low-quality backlit systems. For trade show booth graphics on a backlit system, the graphic file requires specific adjustments: colors must be desaturated by 15 to 20 percent in the design file because backlit illumination amplifies saturation, and contrast must be managed carefully to avoid the brightest areas washing out under the LED panel.
Backlit vs. Front-Lit: When Each Makes Sense
Front-lit graphics — standard fabric or rigid panels illuminated by external track spotlights — are appropriate for exhibitors who want professional lighting without the structural commitment of a lightbox system, or for graphic sections where the content is primarily text-heavy and readability rather than visual impact is the priority. Backlit displays are most effective for the primary back wall, where the graphic is the booth’s dominant brand statement and the visual impact directly influences aisle traffic conversion. A hybrid approach — backlit back wall with front-lit side panels or counters — maximizes visual impact on the primary viewer-facing surface while controlling the total electrical draw and structural weight of the booth.
Backlit Lighting for 10×20 Booths
For a 10×20 trade show booth, a full backlit back wall running the length of the 20-foot span creates the most commanding graphic presence achievable in an inline space. The back wall becomes a luminous brand statement that is visible from deep in the aisle, pulling qualified visitors toward the booth before they have reached it. Combined with a counter with integrated LED strip lighting and two to four track spots on a header rail for product illumination, a 10×20 with a full backlit back wall delivers a visual standard that competes with booth configurations twice its size.
Where Should You Position Lights in a Trade Show Booth?
Light positioning determines whether the lighting system achieves its commercial objectives — attracting aisle attention, illuminating products and graphics at their best, and creating a comfortable conversation environment — or whether it looks like a set of fixtures bolted onto the booth without a coherent plan. Professional lighting design for a booth follows a position-by-function logic: every fixture has a specific visual job, and the combined effect of all fixtures creates a layered environment rather than a flat wash.
| Light Position | Primary Function | Recommended Fixture | Key Setting to Optimize |
|---|---|---|---|
| Header rail / top beam (aiming down at back wall) | Illuminate back wall graphic; create brightness differential from hall ambient light | LED track spotlights, 2–4 per 10-foot section | Aim angle: 30–45° from vertical; beam angle: 36–45° for even wash coverage |
| Counter / product table surface | Highlight product samples, materials, or demo items at conversation height | Focused LED spot (20–30° beam) or LED strip along counter edge | CRI 90+ for accurate product color rendering; 3000–4000K for most product types |
| Back wall (mounted in structural channel) | Create depth behind the main graphic; add visual separation from neighboring booths | LED strip in recessed channel behind back wall bottom edge | Warm white (2700–3000K) for depth effect; set back 2–3 inches from visible surface |
| Conversation zone / overhead in island booths | Create a comfortable ambient environment that encourages dwell time | Pendant lights or recessed downlights in ceiling structure | Soft fill, 2700–3000K; avoid directed beams that create shadows on faces |
| Floor projection (where venue permits) | Define booth perimeter visually from aisle; add branded graphic element to floor | Gobo projector aimed at floor from header or structure mount | Check venue rules before ordering; coordinate with GSC on rigging or floor mount |
| Product display shelf or case | Direct attention to specific products; reveal surface texture and finish detail | Narrow spot (15–20° beam) per product; LED strip under shelves | CRI 90+ critical; position to reveal finish, not create glare on reflective surfaces |
The most common positioning error is aiming spotlights too steeply — nearly vertical — which creates a hot spot at the top of the graphic and a dark lower half. A 30 to 45 degree angle from vertical, with the track head mounted on a header rail set 12 to 18 inches forward of the back wall’s face, distributes light evenly from top to bottom of a standard 8-foot panel. If the header rail is mounted directly above the back wall with no forward offset, even a well-aimed fixture will not cover the lower graphic section without a second row of lights.
Pure Exhibits Integrates Professional Lighting Into Every Las Vegas Trade Show Booth
From First Design Sketch to Show-Floor Installation.
What Lighting Works Best for Product Displays and Demo Areas?
Product lighting and back wall lighting serve different visual objectives. Back wall lighting is about overall brightness and graphic legibility from distance. Product lighting is about revealing the specific qualities — texture, finish, form, color — that make a product compelling at close range. The two systems require different color temperatures, different beam angles, and sometimes different fixture types.
Color Temperature for Product Categories
Color temperature — measured in Kelvin — determines whether the light feels warm, neutral, or cool. The right choice depends on the product and the brand tone. Warm white (2700 to 3000K) flatters lifestyle products, food and beverage items, natural materials like wood and leather, and any product where an inviting, comfortable ambiance reinforces the brand message. Neutral white (3500 to 4000K) is the safest all-purpose choice for general commercial and B2B products — it reads as professional and accurate without pushing either warm or cool. Cool white and daylight (4000 to 5000K) is appropriate for technology products, medical devices, industrial equipment, and anything where a clinical, precise, high-performance impression supports the product’s positioning.
Color Rendering Index (CRI) for Accurate Product Color
CRI measures how accurately a light source renders the colors of objects compared to natural daylight — on a scale of 0 to 100. For most booth applications, CRI 80 is the minimum acceptable standard. For product categories where color accuracy is commercially critical — apparel, cosmetics, paint and finishes, jewelry, printed materials, food — CRI 90 or above is necessary to ensure the product appears as intended. A product photographed at CRI 95 but displayed under CRI 75 show floor lighting will look different to the buyer than it does in every other context they have seen it. Request CRI specifications from your exhibit house when selecting fixtures, not just wattage and color temperature.
Demo Area Lighting: Screen Readability vs. Ambient Fill
Booth areas featuring monitor displays, interactive touchscreens, or demonstration technology require a different lighting approach than product display areas. Direct spotlights aimed at a monitor screen create glare that makes the screen difficult to read and sends visitors away rather than drawing them in. Demo areas benefit from soft ambient fill lighting — enough light to illuminate the visitor’s face comfortably during the interaction, without any direct beam hitting the screen surface. Position all directional fixtures so their aim path does not intersect with the monitor face. For booths integrating digital engagement tools like trade show booth QR codes, ensure that the QR code panel is illuminated by a consistent, glare-free light source — codes on surfaces with mixed light or reflective substrates can be difficult to scan reliably.
How Do You Order Electrical Services for Trade Show Booth Lighting?
Booth lighting runs on power ordered through the general services contractor (GSC), not pulled from a wall outlet. Every booth that uses supplemental lighting — any lighting beyond what the hall ambient provides — requires an electrical connection ordered through the GSC’s service forms in the exhibitor kit. For las vegas trade show booth rentals, the GSC for most major Las Vegas shows is Freeman or GES, and the electrical connection is ordered in advance at significantly lower cost than at standard or on-site rates.
Calculating the Amperage You Need
Electrical service from the GSC is sold in amperage increments — typically 5 amp, 10 amp, 15 amp, and 20 amp circuits at 120V. To calculate what you need: add the wattage of every fixture in the booth, divide by 120 (volts), and add a 20 percent safety margin. A typical well-lit 10×20 booth — eight LED track heads at 20 watts each (160W), a backlit 10-foot lightbox at 80W, and two LED strip runs at 30W total — draws approximately 270 watts, or about 2.25 amps. A 5-amp or 10-amp circuit covers this comfortably with margin. Adding a demonstration monitor (50 to 150 watts) and a tablet charging station (30 to 60 watts) still keeps total draw under 5 amps for most configurations. Order a 20-amp circuit if running AV equipment, multiple monitors, or any high-draw devices in addition to lighting — it is always safer and cheaper to order more capacity in advance than to pay on-site for an upgrade.
The Advance Order Deadline: The Most Important Date in Your Electrical Budget
Electrical services ordered before the GSC’s advance deadline — typically 30 days before the show — are priced at advance rates: 25 to 40 percent below standard pricing. Services ordered after the deadline are charged at standard rates. Services ordered on-site are charged at on-site rates, which can be 50 to 75 percent above advance pricing. For a $400 advance-rate electrical connection, missing the deadline and ordering on-site adds $200 to $300. Set a calendar reminder for the GSC advance deadline the day you receive the exhibitor kit — it is the single highest-return administrative action available in the entire show planning process.
Power Distribution Within the Booth
The GSC delivers power to a single floor box at or near the booth space. Distributing that power throughout the booth requires power strips or extension cords running from the floor box to each fixture location. Most shows specify minimum cord gauge (typically 14-gauge or heavier for runs over 25 feet) and prohibit consumer-grade power strips with surge protectors containing long cords. Check the show’s electrical rules in the exhibitor kit before purchasing power distribution equipment. Bring extra power strips and extension cords to the show — they are on the list of essential items in any well-prepared booth kit, and buying them on-site at a convention center costs significantly more than bringing them from home.
What Are the Most Common Trade Show Booth Lighting Mistakes?
The most frequent lighting failures at trade shows are not equipment failures — they are planning failures. The fixture worked perfectly in the exhibit house’s facility; the problem appeared on the show floor because a critical step was skipped in the specification, ordering, or testing process. The what to bring to a trade show checklist includes a lighting backup section — extra bulbs, extension cords, and a power strip — because show-day fixes are always more expensive than pre-show preparation. The most common trade show booth lighting ideas that fail in execution share one of the patterns in the table below.
| Mistake | Why It Fails | Fix |
|---|---|---|
| No supplemental lighting at all | Booth operates under flat hall ambient; graphics look washed out; no visual differentiation from neighbors | Order a minimum of back wall track lighting and one product spot; any supplemental light is better than none |
| Track spotlights aimed nearly vertical | Creates hot spot at top of graphic, dark lower half; uneven illumination across the panel face | Mount header rail 12–18″ forward of back wall; aim fixtures at 30–45° from vertical for even top-to-bottom coverage |
| Wrong color temperature for the product | Warm light (2700K) on a technology product looks dated; cool light (5000K) on a natural material product looks clinical | Match color temperature to product category and brand tone; see the color temperature guide in Section 5 |
| Backlit display with unmodified graphic files | Standard-saturation graphics appear over-saturated under backlit illumination; bright areas wash out | Reduce saturation 15–20% and lighten contrast in graphic files specifically prepared for backlit output |
| Spotlights aimed at visitors’ faces | Glare from direct beam at eye level causes discomfort and shortens visitor dwell time | Aim all spotlights at display surfaces, not into the conversation zone; use pendant or ambient fill for occupied areas |
| Low CRI fixtures on color-critical products | Product colors appear different from every other context the buyer has seen them; erodes trust in product quality | Specify CRI 90+ for any product category where color accuracy matters; verify CRI spec with exhibit house before selecting fixtures |
| Insufficient electrical capacity ordered | Circuit trips during the show; booth goes dark; repriming requires an on-site electrician at on-site labor rates | Calculate total wattage, divide by 120, add 20% margin; round up to the next circuit tier; always order more than the minimum |
| No pre-show lighting test | Problems discovered on move-in day — misaimed fixtures, insufficient coverage, wrong color temperature — cannot be corrected without tools and time that the move-in window may not allow | Build the booth at the exhibit house’s facility or pre-stage the lighting system before the show to confirm coverage, aim, and color before it needs to be perfect |
How Does Booth Lighting Fit Into the Overall Booth Design?
Booth lighting is not an add-on applied to a completed design — it is a structural and electrical planning decision that must be made at the same time as the booth layout, the graphic content, and the product display configuration. The position of the header rail determines what can be lit and from what angle. The presence or absence of a backlit display determines the graphic file specifications and the electrical load. The placement of conversation furniture determines where ambient fill is needed and where directional light must be excluded. For exhibition booth design, lighting is a first-pass design decision, not a final-pass finishing element.
Lighting as a Visual Hierarchy Tool
In a well-designed booth, lighting creates a visual hierarchy that guides visitors through the space in the intended sequence: aisle brightness draws them in, back wall illumination delivers the brand and value proposition, product lighting pulls attention to the specific items they should be evaluating, and conversation zone ambient lighting creates a comfortable environment for the interaction that closes the visit. Each layer of lighting supports the next stage of the visitor’s experience. A booth where everything is illuminated at the same brightness level — or where the lighting has no intentional hierarchy — forces the visitor to construct that sequence themselves, which most visitors will not do.
Coordinating Lighting With Graphic Design
Graphics designed without knowing the lighting system that will illuminate them are frequently under-specified or wrongly specified for the actual light source. A graphic designed to look good under warm 3000K spot lighting will look different under cool 5000K backlit illumination. A graphic with fine detail and subtle color gradients will read differently under a 36-degree wash than under a 20-degree spotlight. The professional approach — especially when working with a graphic-intensive back wall or a backlit display — is to finalize the lighting plan before the trade show booth graphics are produced, so the file can be color-corrected for the actual light source that will illuminate it. This coordination happens naturally when the exhibit house manages both the booth design and the graphic production as integrated deliverables.
Pure Exhibits and Integrated Lighting Design in Las Vegas
For exhibitors at Las Vegas shows, Pure Exhibits designs booth lighting as part of the integrated exhibit design process — not as a separate afterthought. Track lighting positions, backlit display specifications, accent lighting runs, and electrical draw calculations are all established in the design phase so the GSC electrical order accurately reflects the booth’s actual power requirements and the lighting system performs as intended from the first show day. The pre-build at the Las Vegas facility confirms the lighting system in real conditions — color temperature, coverage, beam angle, and electrical performance — before the exhibit reaches the convention floor.
Conclusion
The most impactful trade show booth lighting ideas share a common structure: a primary layer that makes the booth brighter and more visible than the surrounding hall, a secondary layer that directs attention to the specific products or messages that matter most, and an accent layer that creates depth, character, and visual interest without overwhelming the space. Backlit displays deliver the single highest-impact upgrade per square foot. LED track spotlights on a properly positioned header rail deliver even, adjustable graphic illumination at a fraction of the cost. LED strip lighting adds edge definition and depth without significant amperage. All three together, planned from the first design consultation, executed with the right color temperature for the product, and tested before the show opens, produce a booth that reads as professionally designed from aisle distance.
The planning discipline that separates booths that perform from booths that look good in the exhibit house but underperform on the show floor is integrating the lighting system into the design from the start — not bolting it on at the end. As a trade show booth builder operating out of Las Vegas, Pure Exhibits treats lighting as a core design component, not an optional upgrade, in every exhibit program it delivers to the Las Vegas convention floor.
Let’s Build Something Extraordinary
Share your event details and we’ll craft a custom booth solution designed to captivate your audience and maximize your ROI.
Frequently Asked Questions
What is the best lighting for a trade show booth?
The most effective lighting system for a professional trade show booth combines three layers: a primary back wall layer (LED track spotlights on a header rail or a backlit SEG display), a secondary product layer (focused LED spotlights or strip lighting on counters and display surfaces), and an accent layer (LED strip in structural channels or a gobo projector) for depth and visual interest. If budget allows only one upgrade, a backlit SEG display on the back wall delivers the highest single-element impact — it makes graphic colors appear vivid from aisle distance in a way no front-lit system can match. If budget allows only for front-lit fixtures, four to six LED track spotlights on a properly positioned header rail aimed at 30 to 45 degrees from vertical cover a 10×20 back wall evenly and significantly outperform hall ambient light alone.
How much does trade show booth lighting cost?
Trade show booth lighting costs span two separate budget categories: the fixtures themselves (part of the exhibit production or rental cost) and the electrical service connection (ordered through the GSC in the exhibitor kit). A professional LED track lighting system for a 10×20 booth — six to eight fixtures on a header rail — costs $300 to $800 as part of a rental program and $800 to $2,500 to purchase. A backlit SEG display for a 10-foot back wall costs $1,200 to $3,500 as part of a rental program depending on size and complexity. GSC electrical service for a well-lit 10×20 booth typically draws 3 to 7 amps; a 10-amp or 20-amp circuit ordered in advance costs $150 to $400 at most major Las Vegas shows. Total lighting investment for a professionally lit 10×20 booth: $500 to $1,500 per show in rental and electrical costs, producing a visual ROI that is immediately visible in aisle traffic response.
What color temperature is best for a trade show booth?
The optimal color temperature depends on the product category and brand tone. For lifestyle, consumer, and hospitality-oriented products — food and beverage, home goods, apparel, natural materials — warm white at 2700 to 3000K creates an inviting environment that flatters the product. For general B2B commercial products — industrial equipment, business services, healthcare technology — neutral white at 3500 to 4000K is the standard choice: professional, accurate, and universally readable. For technology products, precision instruments, medical devices, or any brand positioning around performance and innovation — cool white at 4000 to 5000K reinforces the product’s clean, high-performance character. When in doubt, 3500K to 4000K neutral white is the safest all-purpose choice for a trade show booth that needs to read professionally across a mixed buyer audience.
What is a backlit display at a trade show booth?
A backlit display is a display system where the graphic — typically a stretch fabric print — is illuminated from behind by an internal LED light panel, causing it to glow from within rather than being illuminated by external spotlights. The most common format is the SEG (Silicone Edge Graphics) lightbox: an aluminum extrusion frame with an internal LED panel and a graphic printed on stretch fabric with a silicone bead sewn into its perimeter. The graphic snaps into the frame’s channel groove and is pulled taut, creating a seamless, edge-to-edge illuminated display. Backlit displays render colors significantly more vividly than front-lit panels, are visible from greater aisle distances, and deliver the highest visual impact per square foot of any lighting system available for trade show booths.
How do I order electrical service for my booth lighting?
Electrical service for booth lighting is ordered through the general services contractor (GSC) using the service order forms in the exhibitor kit — not from the venue directly and not from your exhibit house. The exhibitor kit, sent after you register for booth space, contains the GSC’s electrical service menu with amperage options and pricing. To order correctly: calculate your total wattage by adding up every fixture you plan to use, divide by 120 (volts) to get amperage, add a 20 percent safety margin, and round up to the next available circuit tier. Order before the advance deadline — typically 30 days before the show — to receive advance pricing, which is 25 to 40 percent lower than standard rates. Missing the advance deadline is the most common and most preventable lighting cost overrun in any trade show program.
Can I use LED strip lights at a trade show booth?
Yes, LED strip lights (also called LED tape lights) are widely used in professional booth programs for counter edge lighting, shelf underlighting, structural accent illumination, and creating halo or glow effects behind or beneath display elements. LED strips draw very low wattage — typically 5 to 10 watts per linear foot — making them an energy-efficient way to add visual depth and interest without significantly increasing the booth’s electrical load. Most exhibit rental systems are compatible with LED strip integration; confirm with your exhibit house that the structural profiles include channels for strip mounting if you want a clean, concealed installation. Consumer-grade LED strip rolls are generally acceptable for booth use, but verify with your exhibit house and the GSC that the cord type and connection method meet the show’s electrical rules before installing.
What is a gobo light at a trade show?
A gobo is a metal or glass disk cut or etched with a pattern — a logo, geometric shape, or texture — that is inserted into a focused projector to project the pattern onto a surface. In trade show applications, gobo projectors most commonly project a branded logo or decorative pattern onto the booth’s floor, the back wall, or — where the venue permits rigging — the ceiling or overhead space above the booth. A floor logo projection is particularly effective for defining the booth’s perimeter visually from the aisle, creating a branded boundary that draws the eye before a visitor has walked in. Check the show’s exhibitor kit and the venue’s rules before planning a gobo floor projection — some shows restrict projections onto carpeted aisles or require a specific projector mounting approach.
How many watts does a trade show booth need?
A professionally lit 10×10 booth with moderate lighting typically draws 200 to 400 watts: four to six LED track spotlights (80 to 150W), one counter LED strip run (30 to 50W), and a tablet or device charger (30 to 60W). A 10×20 booth with full back wall lighting and product spot lighting typically draws 400 to 700 watts: six to eight LED track spotlights (120 to 200W), a backlit display (80 to 150W), LED strip accents (40 to 80W), and technology equipment (100 to 200W). A 20×20 island booth with multiple display zones, pendant lighting, and demonstration technology may draw 1,000 to 2,000 watts or more. Always calculate your actual fixture wattage rather than relying on estimates, add a 20 percent safety margin, and order the appropriate circuit tier from the GSC in advance.
Should I use warm or cool lighting at my trade show booth?
Use warm lighting (2700 to 3000K) if your product category, brand tone, or booth environment benefits from an inviting, comfortable, residential feel — lifestyle products, food and beverage, hospitality, natural materials, apparel, or any brand positioning where warmth and approachability are commercial advantages. Use cool lighting (4000 to 5000K) if your product requires a clean, precise, technical, or clinical environment — technology, medical devices, industrial products, or any brand positioning where performance and precision are commercial advantages. Use neutral white (3500 to 4000K) if you are uncertain or if your booth serves a mixed product or audience profile. The most common mistake is defaulting to cool white (which reads as harsh in non-technical contexts) or warm white (which reads as dim in high-brightness show environments) without considering the specific product and brand impression being created.
How do I make my trade show booth brighter than neighboring booths?
Relative brightness on a show floor is achieved through two approaches: adding more luminous output than the hall ambient provides, and creating visual contrast between your booth’s lighting and the surrounding environment. The most effective tool is a backlit display — it emits light rather than reflecting it, making the back wall appear to glow rather than simply being illuminated. Supplementing with LED track spotlights on the header rail aimed at the product and graphic zones adds additional output and directional interest. Choosing a slightly cooler color temperature than neighboring booths — if the surrounding booths use warm amber-toned lighting — creates a visual contrast that makes your booth appear crisper and brighter even at the same luminous output level. Bringing the total booth brightness up to 2 to 3 times the hall ambient level is a realistic target for a professionally lit 10×20.
What lighting do I need for a 10×10 trade show booth?
A 10×10 booth can be professionally lit with a modest, targeted system: two to four LED track spotlights on a header rail for back wall illumination (covering the 10-foot width evenly from a 30 to 45 degree angle), one counter or tabletop LED strip or spot for product illumination, and optionally one accent element — an LED strip in a structural channel or a small backlit display panel replacing part of the back wall graphic. Total wattage for this configuration: 150 to 300 watts. A 10-amp circuit from the GSC covers this comfortably. The highest single upgrade for a 10×10 is replacing a standard fabric back wall with a backlit SEG lightbox — it transforms the visual presence of the booth from a standard display to a luminous, high-impact back wall that competes visually with much larger booths in the same aisle section.
Does the exhibit house handle booth lighting, or do I need to order it separately?
Your exhibit house handles the physical lighting fixtures — providing, installing, and positioning them as part of the booth build. The exhibit house does not provide the electrical power connection; that is ordered separately through the GSC using the service order forms in the exhibitor kit. The practical workflow is: finalize the lighting plan with your exhibit house as part of the booth design (confirming fixture types, positions, and total wattage draw), receive the exhibitor kit after registering for space, calculate the required amperage from the exhibit house’s wattage specifications, and submit the GSC electrical order before the advance deadline. The exhibit house’s team connects the fixtures to the GSC floor box during installation. Any questions about the electrical load of specific fixtures should be directed to your exhibit house project manager before the advance order is submitted.